
Frigate is a powerful, open-source Network Video Recorder (NVR) that leverages AI for real-time object detection. It’s perfect for home surveillance, security monitoring, and more. In this guide, we’ll walk you through installing Frigate using Portainer Stack, making the process simple and efficient.
Prerequisites
-
- A server or machine running Docker and Portainer.
-
- Basic familiarity with Docker and Portainer.
-
- A configured camera (RTSP or HTTP stream).
Step 1: Prepare Your Environment
1. Ensure Docker and Portainer Are Running
Make sure Docker and Portainer are installed and running on your system. If you haven’t set them up yet, check out our guide on installing Base software.
2. Verify Portainer Access
Open your Portainer web interface by navigating to:
http://<your-server-ip>:9000Log in with your credentials.
Step 2: Create a Frigate Stack in Portainer
1. Navigate to Stacks
In the Portainer dashboard:
-
- Click on Stacks in the left-hand menu.
-
- Click the + Add Stack button.
2. Configure the Stack
-
- Name: Give your stack a name, e.g.,
frigate.
- Name: Give your stack a name, e.g.,
-
- Build Method: Select Web Editor.
3. Add the Frigate Docker Compose Configuration
Paste the following Docker Compose configuration into the web editor:
version: "3.9"
services:
  frigate:
    container_name: frigate
    privileged: true # this may not be necessary for all setups
    restart: always
    network_mode: bridge
    image: ghcr.io/blakeblackshear/frigate:0.15.0-rc2
    shm_size: "300mb" # update for your cameras based on calculation above
    devices:
      - /dev/dri/renderD128:/dev/dri/renderD128
    volumes:
      - /etc/localtime:/etc/localtime:ro
      - /home/username/dockerdata/frigate/config/config.yml:/config/
      - /home/username/dockerdata/frigate/media/:/media/frigate
      - type: tmpfs # Optional: 1GB of memory, reduces SSD/SD Card wear
        target: /tmp/cache
        tmpfs:
          size: 1000000000
    ports:
      - "5000:5000"
      - "5006:8971"
      - "8554:8554" # RTSP feeds
      - "8555:8555/tcp" # WebRTC over tcp
      - "8555:8555/udp" # WebRTC over udp
      - "1984:1984"
4. Customize the Configuration
-
- Replace /home/username/dockerdata/frigate/config with the path to your Frigate configuration directory.
-
- Replace /home/username/dockerdata/frigate/media with the path where you want to store video recordings.
-
- If you’re using a Google Coral TPU or Intel QuickSync, ensure the relevant devices are mapped correctly.
Step 3: Deploy the Stack
-
- Scroll down and click Deploy the Stack.
-
- Portainer will pull the Frigate image and start the container.
Step 4: Configure Frigate
1. Create the Frigate Configuration File
In your /home/username/dockerdata/frigate/config directory, create a file named config.yml. This is where you’ll define your cameras, detectors, and other settings.
Here’s an example configuration for a single camera:
mqtt:
  host: 192.168.1.10  # Optional: MQTT server for integrations
  user: mqtt_user
  password: mqtt_password

cameras:
  front_door:
    ffmpeg:
      inputs:
        - path: rtsp://your_camera_username:[email protected]:554/stream
          roles:
            - detect
            - record
    detect:
      width: 1280
      height: 720
      fps: 5
    objects:
      track:
        - person
        - car
    record:
      enabled: True
      retain:
        days: 7
2. Restart the Frigate Container
If you made changes to the configuration, restart the Frigate container in Portainer to apply them:
-
- Go to Containers in Portainer.
-
- Find the
frigatecontainer and click the Restart button.
- Find the
Step 5: Access Frigate Web UI
Once the container is running, open your browser and navigate to:
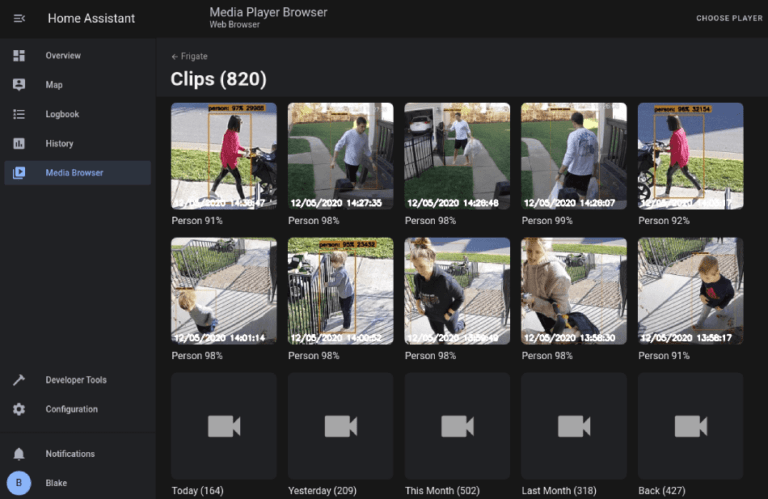
http://<your-server-ip>:5000You’ll see the Frigate web interface, where you can view live feeds, recordings, and AI-detected objects.
Step 6: Optional – Enable Hardware Acceleration
1. Google Coral TPU
If you’re using a Coral TPU for AI object detection, add the following to your config.yml:
detectors:
  coral:
    type: edgetpu
    device: usb
2. Intel QuickSync
For Intel QuickSync, ensure your system supports it and add the following to your config.yml:
ffmpeg:
  hwaccel_args: preset-vaapi
Conclusion
Congratulations! You’ve successfully installed Frigate NVR using Portainer Stack. With Frigate’s AI-powered object detection and Portainer’s easy management, you now have a powerful surveillance system at your fingertips.
Explore Frigate’s advanced features, such as MQTT integrations, custom object detection, and more, to tailor your setup to your needs.
Need help? Leave a comment below or check out the official Frigate documentation for more details. Happy monitoring!