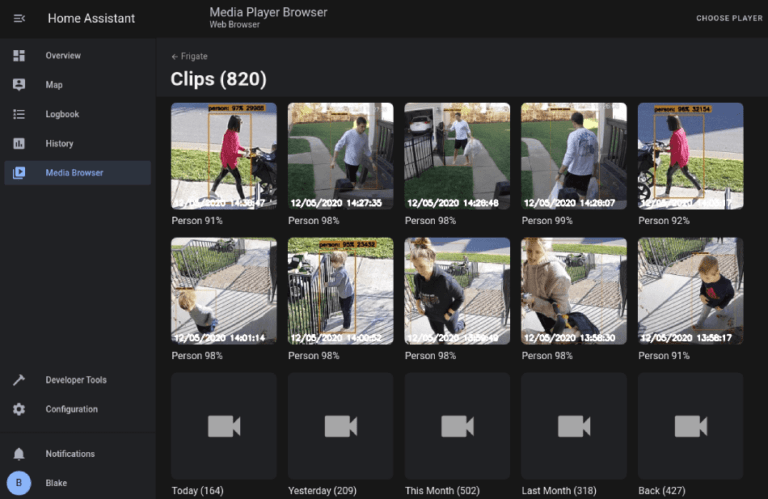
Tailscale is way of viewing your cameras when you are away from home. You have to install the app, switch on the VPN then you will have access to your NVR to view all cameras.
This guide will walk you through the process of installing Tailscale using a Portainer stack and configuring it for secure connections. Tailscale is a zero-config VPN that makes it easy to connect devices securely.
Prerequisites
- Docker and Portainer installed: Ensure Docker and Portainer are set up on your server.
- Tailscale account: Sign up for a free Tailscale account at tailscale.com.
- Tailscale auth key: Generate an auth key from the Tailscale admin panel for automated setup.
Step 1: Generate a Tailscale Auth Key
- Log in to your Tailscale account.
- Go to the Settings page.
- Under the Keys section, click Generate auth key.
- Choose the key type (e.g., ephemeral for temporary devices or reusable for persistent devices).
- Copy the generated key. You’ll use it in the Portainer stack.
Step 2: Create a Portainer Stack for Tailscale
- Log in to your Portainer instance.
- Navigate to Stacks in the left-hand menu.
- Click Add Stack.
- Name your stack (e.g.,
tailscale). - In the Web Editor, paste the following Docker Compose configuration:
version: '3.8'
services:
  tailscale:
    image: tailscale/tailscale:latest
    container_name: tailscale
    environment:
      - TS_AUTHKEY=your_auth_key_here
      - TS_STATE_DIR=/var/lib/tailscale
    volumes:
      - ./tailscale-state:/var/lib/tailscale
    network_mode: "host"
    cap_add:
      - NET_ADMIN
restart: unless-stopped- Replace
your_auth_key_herewith the Tailscale auth key you generated earlier. - Click Deploy the stack.
Step 3: Verify Tailscale Installation
- After deploying the stack, check the logs of the
tailscalecontainer in Portainer to ensure it started successfully. - Go to your Tailscale admin panel. You should see your server listed as a new device.
- Note the Tailscale IP address assigned to your server.
Step 4: Configure Tailscale for Connections
- Accessing Services: Use the Tailscale IP address of your server to access services running on it. For example, if your server has a web app on port 8080, you can access it via
http://[Tailscale-IP]:8080. - Subnet Routing (Optional): If you want your server to route traffic for an entire subnet, enable subnet routing:
- Run the following command in the Tailscale container:
bash tailscale up --advertise-routes=192.168.1.0/24 - Replace
192.168.1.0/24with your subnet. - Approve the subnet route in the Tailscale admin panel.
- Exit Node (Optional): To use your server as an exit node (for routing all internet traffic through it):
- Run the following command in the Tailscale container:
bash tailscale up --advertise-exit-node - Enable the exit node in the Tailscale admin panel.
Step 5: Manage Tailscale
- Update Tailscale: To update Tailscale, simply redeploy the stack with the latest image.
- Remove Tailscale: To remove Tailscale, delete the stack from Portainer and remove the
tailscale-statevolume.
Troubleshooting
- Container Fails to Start: Check the logs for errors. Ensure the auth key is correct and the
tailscale-statevolume has proper permissions. - Device Not Appearing in Tailscale: Verify the auth key and ensure the container is running.
By following this guide, you’ve successfully installed Tailscale using Portainer and configured it for secure connections. Tailscale simplifies secure networking, making it ideal for remote access and private networking. Enjoy!